The Starwave Gets An Outing
The Starwave Gets An Outing
The early part of the season has been a little underwhelming in terms of astronomy for me. While great swathes of the country at times seem to be basking under clear skies from dusk until dawn, our little corner of Herefordshire has been sitting quietly under a mirth of cloudy foggy mess. On the rare few occasions that my work and play time have combined with the weather to allow for astronomy, the window of opportunity has been very short. So, it was an extremely pleasant surprise when I checked the weather forecast during a quiet moment in work, and I saw the much treasured moon symbols across the weather app on my phone stretching into the early hours. It was time to put the Starwave to it's intended use.
Having been through the process of setting it up and having small windows of opportunity to tinker with with the scope in the past couple of months, I'd taken the opportunity to make a few marks on the mount and on the pier to get my alignment pretty good from the start. Thanks to Venus still being visible in the dusky sky, I could get the scope, finder-scope and guide-scope all lined up before darkness really set it. When I bought the scope, I also bought a 50mm Altair guide-scope package with it too. This was with the intention of making use of the AVX mounts guide port and guiding capabilities. As yet, I haven't had time to set all that up and learn how to using the PHD guiding software. That will come. But what I have used is the free SharpCap software in conjunction with the guide scope and GPCAM to help with my polar alignment. Without going into the details, it makes the job very easy, and has so far to be proved extremely accurate. This is very important when it comes to unguided astrophotography. Perhaps more on that in another post on another day.
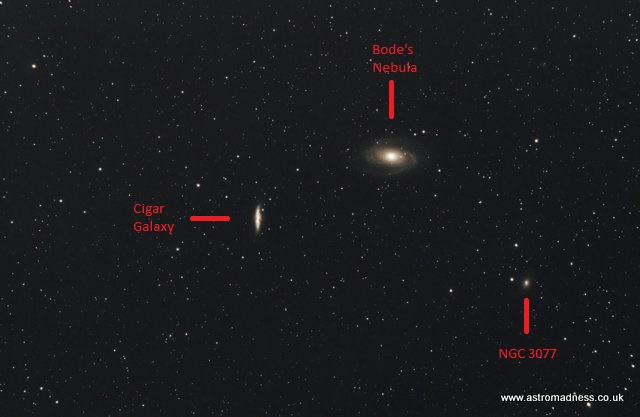
My target for the evening's photography actually included 3 well defined targets all in the same field of view. M81, known as Bode's Nebula and M82 also known as the Cigar Galaxy are a pair of spiral galxies which are joined by much dimmer galaxy designated NGC 3077. Through the eyepiece of the refractor, M81 and M82 were only just visible. I could not see NGC 3077 at all.
After taking several test photos to check for focus, framing, iso settings and exposure times, it was time to start gathering the data. In all, I used the following settings:
- 30 x Light frames of 90 seconds at iso 1600.
- 15 x Dark frames of 90 seconds at iso 1600.
- 15 x Bias frames of 1/4000 second at iso 1600.
- 15 x Flat frames at the same focus with the DSLR set to auto.
- All taken with an unmodded Canon EOS 1100d DSLR and focal reducer. No Filters.
- Altair Starwave 80 ED-R telescope.
- Celestron AVX Mount unguided.
- 95% of the Light frames were used in the final stack giving a total exposure of 42 minutes.
- Frames stacked in Deep Sky Stacker.
- Post processing in Adobe Photoshop CS2.
- DSLR sensor temperature remained around 20c throughout.
Once all the data was collected and stacked, I started processing the image, saving several versions along the way. Processing the image has proved to be extremely challenging, but fortunately, now I have all the data, it's something that I can revisit time after time as my processing improves. The following pictures have all come from the original stacked result.
 |
| The 3 objects all framed in the same field of view with very slight cropping applied to aid the initial processing. |
 |
| A little more processing, and then cropped to frame the 3 galaxies in the picture more centrally. |
 |
| A little more cropping and processing including some colour enhancement to bring out the dust lanes and the arms of M81. |
So, for the moment, this is as best as I can get the image. It's probably taken an hour or two to get it this far. When the original picture is viewed at full size, the picture is quite noisy, probably due to the high iso used when gathering the data. The next time I take this sort of image, I will probably used an iso of 800 or 400, and, providing my polar alignment is right, I will increased the exposure time up to 150 or 180 seconds.
What I am pleased with in this set of data is the focus achieved using the refractor, and also the quality of the tracking. I have not been able to find any sign of star trailing in the original pictures which will encourage me to increase the exposure length next time.
Thanks for reading!


Comments
Post a Comment